Showing posts with label before & after. Show all posts

Wednesday, September 28, 2016

Sea Glass Cottage gets a new look!


                                      Welcome to the new Sea Glass Cottage!


I'm happy to be stopping in today to give a peek at some of the updating I've been doing around the exterior of the beach house.

I really didn't fall off the planet for all these months -- the initial "just painting the exterior" turned into a very involved rebuilding of three levels of porches (back and front), rebuilding exterior staircases to code, and then waiting for the weather to cooperate for a proper paint job. It was quite an undertaking, but very worth the effort! While all of this was going on, my family kept busy with life, even spending two weeks in London, England for a fabulous vacation.

Just in case you don't know what the original exterior looked like, it is a traditional West Indies style beach house with lots of decorative details in a pale yellow and white. All the white was beginning to look very gray and dirty and worn. When I named it Sea Glass Cottage, I knew it would have to be a shade of blue. All the lovely details were lost in a sea of white.


                                                                      ( Before )


After a really fun experience of experimenting with every shade of blue and aqua, I finally chose Benjamin Moore's Yarmouth Blue for the base, and Jamestown Blue for the porch shutters. I kept the trim and the bahama shades around the house white. The entire porch deck was rebuilt with Trex decking in a pretty blue-gray shade.

I hope you enjoy the new look!


                                         Welcome!   Come on over and sit a while!


First floor porch --fresh white adirondack chairs are decked out with ikat designs on pillows in sea glass colors of blue, teal, and aqua. Occasional tables are there for your glass of wine or iced tea.

Second floor porch -- rocking chairs to watch the water and dream as the clouds go by.....


The back staircase and outdoor shower area  is rebuilt, nice and sturdy, safe, and looks so fresh and clean!


Next on the list of to-do's, freshening up the landscaping. But that's for another day!


Thank you for visiting my new blue beach house! I'm very happy with the new look as now it feels like I put my stamp on the house and it is really "me."


  See you next time!


Sharing this post at......

Anything Blue at The Dedicated House (featured!)
McCall Manor at Your Inspired Design

Tuesday, July 21, 2015

Beach Cottage Kitchen


Ahhhhhhh, white. How I love white! Especially in a beach kitchen.

The kitchen in my beach cottage went through a major remodel a few years ago by a previous decorator/owner. She has phenomenal taste and chose beautiful, classic materials for an all-white kitchen.

But it wasn't always like that......

One day, I was playing around on my computer doing a search of my cottage address and couldn't believe what popped up --it's amazing what you can find on the internet! I found pictures of what my house originally looked like back in the 1990's went it was first built.

Here's what the kitchen looked like BEFORE the major renovation by another owner:


Yes, I know what you are thinking! I thought the same thing when I found this photo (most likely an old real estate listing photo circa 1990's). I think I would have run from the house if it looked like this today, never to return. Builder grade cabinets, white tile countertops....and the floor tiles -- what color are they anyway? Green and.....pink? Pink?! (*shudders*)

Thank goodness I did not have to tackle the remodeling of the kitchen. If I had to hand pick materials for the kitchen, I would have picked exactly what is currently here. I love everything about it, from the white subway tiles, the marble countertops, the hardwood floor, the glass cabinets, the farmhouse sink, beadboard island, and the stainless steel appliances. Perfection!

Here is my kitchen today as I am settling in and adding my own touches......partially decluttered of previous owners' decor and kitchen items. (I still have to tackle the glass cabinets, purge, and make them pretty and organized. The cabinets are packed with things that are outdated or not needed, so that is a project that needs my immediate attention.


And you can't beat the view from the kitchen sink window! I can wash dishes and enjoy the water view at the same time. I love my kitchen!


Thank you for visiting Sea Glass Cottage --


Sharing at  *Savvy Southern Style: Wow Us Wednesday (Featured!)
                    My Romantic Home: Show and Tell Friday
                   *Katherine's Corner: Thursday Favorite Things (Featured!)
                     The Vintage Nest: Share Your Style
                     Coastal Charm: Show and Share

Saturday, July 18, 2015

Boy's Bedroom Makeover - Vintage Nautical Style Part 1

One of my favorite design styles in our beach cottage was this children's bedroom to the right of the entrance hall.

It was furnished with darling toddler bunk beds decorated in a nautical theme which continued into the en-suite bathroom.

Unfortunately, the toddler beds would never work for my still-growing teenage son (over six feet tall) and adult guests. The sellers agreed to take the bunk beds when they moved, so I'm pleased that they will continue to be used.

BEFORE:


Keeping with the nautical theme, here is my son's room after the makeover (which can also be used as a guest room in a pinch).


AFTER:


The main color inspiration for the room were the Tommy Bahama pillows. (I literally found these awesome Tommy Bahama pillows in a hall closet in the cottage. Such treasures are found all throughout the house packed away!) I pulled these colors from the existing pillows to add accents and fabrics to the bedroom.


I chose a tea-stained color for the bedding and accented the room with navy curtains and red striped accent pillows. A comfy red chair is perfect for reading and watching tv.

I loved that I was able to keep the nautical look while updating the room to make it comfortable for adults -- and my son can actually FIT in the bed!  ;)


My next post will highlight all the vintage nautical details around the bedroom and bathroom.

I hope you enjoyed this before and after boy's bedroom makeover! You can read Part 2 (decor details) here.


Sharing this post at The Dedicated House: Before & After Wednesday;
                                My Romantic Home: Show & Tell Friday

Sunday, July 5, 2015

Master Bedroom - A Work in Progress

Welcome to my master bedroom retreat!

I wanted my master bedroom to feel very light and airy. It is located on the third floor of Sea Glass Cottage and has a beautiful view of the gulf beach through the double french doors.


When I first purchased the house, the owner's bedroom was decorated in very dark, earthy tones and turquoise. It was completely the opposite of my all-white, open and airy vision.

 The the basic furniture pieces (canopy bed, chairs, end tables, and secretary) were gorgeous white, and the walls were painted in a very soft sky blue. I spent most of my redecorating time changing out fabrics such as bedding, curtains, rugs, and pillows.

Here is the BEFORE picture of the master bedroom when I first purchased the house:


Here are the AFTER photos after changing out fabrics:


I added fresh white storage benches; sheer white curtains to blow in the breeze around the bed, and mercury glass lamps replaced the heavy original wood lamps. 


There are two slipcovered chairs and a slipcovered ottoman at the foot of the bed. I added a white glass mason jar with cream and dusty blue flowers, a few starfish, and of course, coastal-themed magazines. Baskets in the tv stand hold other books and magazines.


I added a pretty blue area rug for a pop of blue, as well as blue and white sea themed pillows.
My next master bedroom project is to change out the dark framed pictures over the bed for a lighter, fresher look.  


A beautiful bowl of sea glass on my nightstand.


A secretary filled with mercury glass items and beach treasures.


Shabby chic table to hold my cup of tea when I'm curled up in the chair reading or watching tv.


More great storage in this cozy window seat.  I'd like to get a soft seat cushion for this spot to complete it.

Please come back to see more home tours of Sea Glass Cottage!

                        My Romantic Home: Show and Tell Friday
                        Between Naps on the Porch: Metamorphosis Monday
                        Coastal Charm: Show and Share 

Wednesday, July 1, 2015

Driftwood Mirror Makeover

I have many driftwood items throughout my house, but one of the first projects I wanted to tackle was my entrance hall mirror.

BEFORE:


It was beautiful, but the entryway table was white and I wanted a lighter look than the dark tones of the driftwood to match the vintage table. 

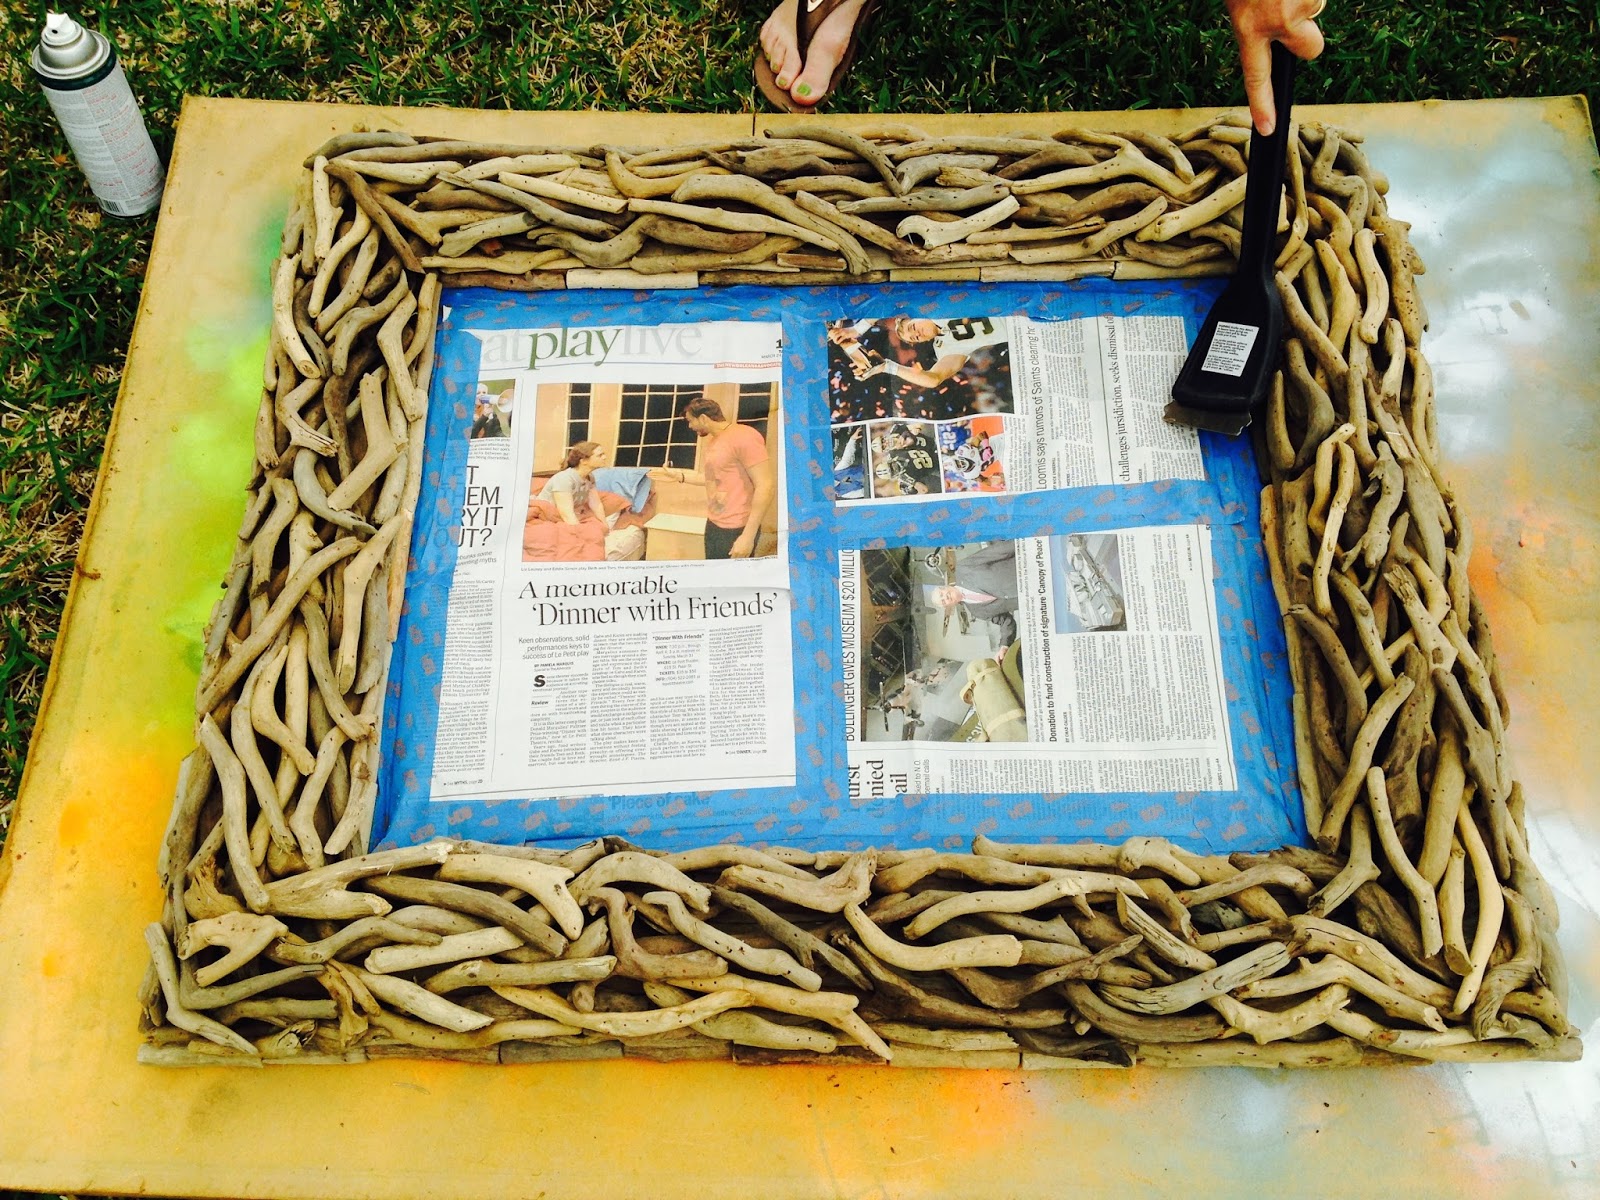
I recruited a few friends for a DIY project and in just a few hours we had a beautiful change.


Here's how we changed the look of the mirror:

l. First, we protected the mirror by taping newspaper on the surface.

2. After using a bristle brush to roughen up the surface, we gave it a light dusting to remove any residue.


3. A spray can of white paint was all it took to cover the wood. I didn't need it to be coated with many coats of paint as I liked the darker shadows inside the mirror to add texture and contrast. Just a few light layers of spray paint, allowing time to dry between coats.


4. The fun part was going through our stash of shells and sea glass; using a hot glue gun, we arranged clusters of sea treasures in each corner.  We also added a few individual pieces of sea glass in random places around the frame for a little sparkle and pop of color.


5.  When all was dried, I sprayed the entire frame and sea shell clusters with a clear coat of polyurethane to seal it. (Note: This was an outdoor project and I highly recommend spray paint and polyurethane spray projects to be in well-ventilated areas or outdoors.)


AFTER:


I think it's a beautiful way to welcome guests to Sea Glass Cottage!

Sharing this post At:


Tuesday, June 30, 2015

Painting Furniture


Even though I purchased my beach house fully furnished, there were so many style choices of the previous owner that I wanted to change.

First, my vision of a cottage-style home was light, bright, white, and open. I wanted soft fabrics on the windows, seagrass rugs on the hardwood floors, and as many white slipcovered pieces as possible.

The owner had a very dark, earth-toned style throughout the house. It was rustic and comfortable, but I didn't share her love of heavy fabrics and the tans, browns, and black furniture pieces she had in the large family den. I loved the style of the furniture, just not the color.

I did a little research and discovered that chalk paint (or a similar-type paint that leaves a chalky finish) would be the perfect solution to keeping the furniture.  The pieces were in perfectly good condition; they just needed sprucing up. It's so easy to use chalk-type paints -- there's no sanding or prepping! Just a quick dusting with a cloth and then the piece is ready to be painted.

Here is a television hutch and sofa table that were custom pieces for the home. They were beautifully made and I loved the style -- but black in a beach house?  I just didn't get it. I couldn't wait to apply a coat of paint to make them lighter and fresher. Chalk paint is not meant to be perfect, so if I messed up, it wouldn't be a big deal.

BEFORE:


  AFTER:

I used Martha Stewart vintage decor paint in Antique Sky for sofa table to change it to a soft, pastel color. It's actually more mint green than blue, but I love the transformation.


I just experimented at first to see how a light coat would look; I also experimented with wiping some of it off with a cloth. I eventually decided one thicker coat would give me the look I wanted. The wood was very textured so the paint didn't grab in all the spots, and that was okay with me. I just let the paint glide on and didn't try to completely cover the distressed look.


The finished look -- I love the contrast of the dark wood top and the painted bottom. I'm also perfectly okay that some of the pieces of wood absorbed more of the paint than others, and I'm also fine that the whole piece appears distressed without even having to apply sandpaper.


I used Martha Stewart vintage decor paint in ivory for the television hutch. 


I'm very happy with the results as they look very shabby chic. I left the tops of the furniture the dark wood for a nice contrast.  Since I only did one coat on each, I finished both projects in only two days.

There are also several dark picture frames around the house that will definitely be changed using chalk paint.